Preparing an RTEMS SD Card Image For Beaglebone Black
We’ll see how to boot RTEMS on Beaglebone Black using a SD Card.
Preparing an RTEMS SD Card Image For Beaglebone Black
To prepare the SD Card image for the Beaglebone Black, I would suggest you to follow the tutorial by Vijay.
Getting started with RTEMS on Beaglebone black - part II
NOTE: When copying the uEnv.txt content from the tutorial above, it’ll sometimes add an unnecessary
new line which won’t boot the board. It should be as below (3 lines).[1]
setenv bootdelay 5
uenvcmd=run boot
boot=fatload mmc 0 0x80800000 rtems-app.img ; fatload mmc 0 0x88000000 am335x-boneblack.dtb ; bootm 0x80800000 - 0x88000000
We need 3 files in the SD Card.
- uEnv.txt
- rtems-app.img
- am335x-boneblack.dtb
If you reached here then you know how to run an rtems app on the Beaglebone Black ;)
A bit about uEnv
Beaglebone Black’s official Debian image(flashed by default in the eMMC of
the board) is packed with U-Boot bootloader. So the uEnv.txt is for the
bootloader for us to overide the default behaviout of the bootloader.
The U-Boot first looks for the uEnv.txt file in the SD card.
Line 01:
Sets a delay of 5 seconds before booting.
We can interrupt at this point and enter the U-Boot shell.
Try interupting and run the help command to view the available U-Boot commands
Line 02:
Set uenvcmd variable which is executed by U-Boot if found.
run the boot command which is defined in the 3rd line.
Line 03:
Sequence of U-Boot commands seperated by the ; and set to the boot variable.
fatload mmc 0 0x80800000 rtems-app.img ;
fatload is used to load binary from fat file system.
mmc 0 refers the SD card. mmc 1 is the eMMC of the board.
So the fatload commands will load the rtems-app.img to the address 0x80800000
and the device tree to the address 0x88000000 in memory.
bootm <address of kernel> <address of ramdisk> <address of dtb>
This command starts running the kernel by loading the files from the specified addresses.
We are not using ramdisk hence the dash - in the middle.
Preparing the files for the SD Card - Short Version
We need to use the mkimage from u-boot to create the bootable image. If you don’t have the tool you can install it with the command,
sudo apt install u-boot-tools
Now create a folder sd-image. Copy the telnet01.exe from the LibBSD testsuit to this folder.
Now change into the sd-image directory. Then run the following commands.
arm-rtems6-objcopy telnetd01.exe -O binary app.bin
RTEMS Toolsuit must be added in the PATH to run the above command.
gzip -9 app.bin
mkimage -A arm -O linux -T kernel -a 0x80000000 -e 0x80000000 -n RTEMS -d app.bin.gz rtems-app.img
rtems-app.img is the final image we want to copy into the SD Card.
Build the required device tree blob from freebsd sources.
git clone https://github.com/freebsd/freebsd.git
This is a large repository (~1.2GB). So it’ll take some time to clone.
run following without going into the freebsd directory
MACHINE='arm' freebsd/sys/tools/fdt/make_dtb.sh \
freebsd/sys \
freebsd/sys/contrib/device-tree/src/arm/am335x-boneblack.dts \
$(pwd)
Preparing the SD Card - Short Version
This tutorial is extracted from here
We are going to,
- Unmount SD Card partitions
- Delete prvious partitions
- Create BOOT(FAT32) and ROOT(ext4) partitions
- Write the partition table to SD Card
- Format the SD Card with new partition table
!!!WARNING!!! If you choose the wrong
sdXX, it will break your system. So make sure that you are selecting thesdXXof the SD Card. I have two storage devices in my laptop which aresdaandsdb. So for the SD Card I getsdc. So the partition issdc1.
Use lsblk command to view your drives.
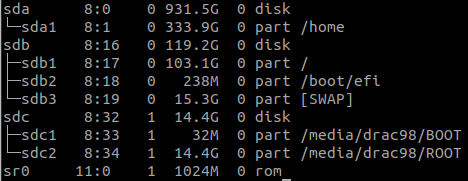
sdc is the drive and sdc1 and sdc2 are the BOOT and ROOT partitions respectively after preparing the SD Card.
The commands to partition the SD Card is given below. To view the command with the outputs see here.
Use the fdisk utility as root or with sudo to create our required partitions, using the following steps:
Unmount any mounted partition
$ umount /dev/sdc1
Run fdisk (in Linux)
$ sudo fdisk /dev/sdc
Delete the previous partition(s)
Command (m for help): d
Create new partition called BOOT of 32 MB and type primary:
Command (m for help): n

Select (default p):

Partition number (1-4, default 1):

First sector (2048-7774207, default 2048):

Last sector, +sectors or +size{K,M,G} (2048-7774207, default 7774207): +32M
Press ENTER to give the default values.
Create a second partition to hold rootfs. give all the remaining space
Command (m for help): n

Select (default p):

Partition number (1-4, default 2):

First sector (67584-7774207, default 67584):

Last sector, +sectors or +size{K,M,G} (67584-7774207, default 7774207):
Make the first partition bootable by setting the boot flag:
Command (m for help): a
Partition number (1-4): 1
Set the first partition as WIN95 FAT32 (LBA):
Command (m for help): t
Selected partition 1
Hex code (type L to list codes): c
We are done with the filesystem modification. Let’s write it by issuing the w command:
Command (m for help): w
Format the first partition as FAT and Label it as BOOT
sudo mkfs.vfat -n "BOOT" /dev/sdc1
Format the second partition as an ext4 filesystem.
Label it as ROOT as it will contain the extracted image of rootfs.
sudo mkfs.ext4 -L "ROOT" /dev/sdc2
Now copy the following 3 files to the BOOT partition created:
- uEnv.txt
- am335x-boneblack.dtb and
- rtems-app.img (no MLO needed).
LibBSD Testsuit
We’ll try to run the telnet01.exe from the LibBSD testsuit on the BBB and view the output.
Prepare the rtems-app.img by following the tutorial mentioned above.
If you are getting something similar to this, you just now successfully ran a RTEMS LibBSD app. Congrats!
NOTE: To observe the output, you need a USB to Serial Converter. To connect the serial converter see this, this or this. Hopefully after I implement the Serial over USB for GSoC 2021 you won’t need the converter to view the RTEMS Serial Output ;)
Resource
RTEMS LibBSD README
Prebuilt files to test ticker example (By Christian Mauderer)